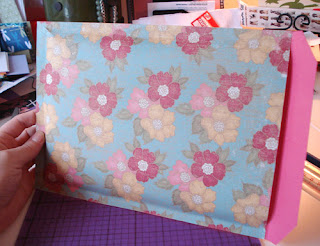
Any time we can use up left over paper and cardstock in a project that will be used frequently we get giddy and excited! So when we saw this tutorial over on the Shoplet.com blog (originally from 27 Things) for a bubble mailer we knew we wanted to share it. We are always shipping things and when it comes to packaging sometimes pretty isn’t an option. Being able to use our paper scraps we can customize the look of our mailers to fit the needs of what we’ll be mailing.
|
| Source: 27 Things |
The tutorial below is to make a 6×9 mailer but as she says in her original post, you can make the mailers to any size you prefer. We can’t wait to get started! For more pictures as you move along check out 27 Things’ awesome step-by-step pictures.
- cardstock (one 7.5″ x 10.75″ sheet)
- pretty paper (one 7.5″ x 10.75″ sheets)
- rubber cement
- bubble wrap (two 6″ x 9″ pieces)
- art knife (X-Acto knif)
- cutting mat
- scissors
- ruler
- a scoring tool or an old ballpoint pen that is out of ink
Getting Started
Start by trimming everything to size. This includes your card stock, paper and bubble wrap.
The bubble wrap should be trimmed to the inside dimension of your mailer, in this case 6″ x 9″. The card stock will be cut to finished size of your mailer, including a 1″ flap, in this case 7.5″ x 10.75″. Your paper should be cut slightly larger than the finished mailer on the 3 sides that will be adhered to the card stock.
I like to allow for a decent seam around the edges and bottom of my mailers. A larger seams means that your mailer will be less likely to pop open when you fill it and/or during transport.
A note on rubber cement -
Rubber cement is great in that it can be used for 2 types of adhesion: temporary and permanent. The best result for mailers is achieved using a cured bond. This means you apply the rubber cement to both surfaces and allow it to dry before joining.
 1. Have your bubble wrap ready to the side of your work area.
2. Lay your card stock and patterned paper side by side and face down on your work area.
3. Line up the bottom edges of your sheets.
4. Apply a 2″ border around all 4 edges of your patterned paper, starting at the bottom, then the sides, saving the top edge for last.
5. Place one piece of bubble wrap, bubble side down and smooth side up, onto the wet sheet. Be sure make the top edge of the bubble wrap line up flush with the top edge of the paper.
6. Using your patterned paper as a guide, apply a 2″ border of rubber cement along the bottom edge and sides of your card stock. You don’t want to apply any glue in the area that will later be used as your flap. Apply a line of rubber cement across the top edge of your GLUED AREA and place the 2nd sheet of bubble wrap flush with this line.
Time for a break.
Take a breather and let the rubber cement dry completely.
Joining
1. Begin by making 2 small angled cuts on the bottom edge of the patterned paper. Cut from 1/4″ from the corner of the paper over the the corner of the bubble wrap, stopping slightly shy of the bubble. Repeat on the opposite corner. This will prevent the paper from buckling along the bottom edge.
2. lay the card stock bubble up and then gently lay the paper bubble down on top of it.
 3. without applying any pressure to the glued edges, carefully line up the four corners of the bubble wrap.
4. Holding the sheets in place with your palms, use both pointer fingers to press the center of one edge of the paper onto the card stock edge. Join the rest of the edge by pressing down both fingers and moving them away from each other toward the corners.
Be sure that you don’t accidentally press down the corners of the bottom flap. You can use your scissors as a temporary barrier until you get the hang of it.
5. Repeat on the opposite side.
6. Repeat the above step on the bottom edge. Be sure to start in the middle!
Finishing up
Your mailer is almost done! Time to trim, burnish, score and fold!
 1. Your edges will likely be crooked or have card stock or paper hanging over the edge. Trim the sides and bottoms to obtain an even edge of paper and card stock.
2. Use a ruler and a scoring tool (or inkless pen) to score a line along the flap about 1/8″ away from the opening of the mailer. This will make a nice clean fold.
3. Cut off the corners of the flap.
4. Using the rounded end of your art knife or pen, carefully rub along the 3 seams of the envelope. Gently run your tool along the edge of the bubble wrap to ensure all the paper is joined.
Enjoy!
Guess what? Your mailer is ready for mailing! I used strong double-sided tape to seal my flaps, but they can also be taped closed from the outside. Time to get mailing!
Post Your Pictures
Feel to post pictures of mailers you have created or received in 27 Things’ Secret Mailers Flickr Group!
A Note from 27 Things:
Of course, it is my pleasure to share the mysterious process involved in making my top secret mailers. In return, I ask that you do not reproduce my mailers for resale and that you enjoy using them for your business or personal mailing. Should you decide that my mailers are beyond the scope of your abilities but you’d still like to have some, they are available in small sets on Etsy. Happy crafting!


