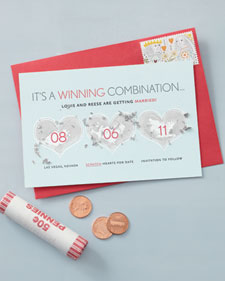
Brides are always looking for a fun and unique way to set their stationery apart from others out there. Well we just ran into a great idea for a DIY save-the-date card over at Martha Stewart Weddings. It’s not only cute but interactive as well! Guests are sure to clear their calendar for your special day with this original card.
 Tools and Supplies
- Ink-jet and laser printer
- 8 1/2-by-11-inch card stock in white or cream (you will print 2 cards per sheet)
- Craft knife and metal ruler
- Metallic acrylic paint (we used Golden Artist Colors acrylic paint in iridescent silver, $4.75, utrechtart.com)
- Liquid dish soap
- 1/4-inch-wide watercolor brush
- A7 envelopes (5 1/4 by 7 1/4 inches)
- Pennies
Basic How-To
- Download Martha’s PDF file, and open it using Adobe Acrobat Reader (if you are using a Mac, use Reader instead of Apple’s Preview application).
- Replace the placeholder text with your own (you only need to do this in one box; the form will automatically fill in the rest), and print onto card stock.
- Use the craft knife and metal ruler to cut between the crop marks (do not cut all the way to the edges of the paper; this will leave the crop marks intact around all the edges to guide subsequent cuts).
- Combine one part dish soap with two parts metallic acrylic paint. Paint neatly over the number in the center of the hearts with a thin layer. Let it dry thoroughly, about 1 hour, and then add a second layer. Let second coat dry thoroughly (about 1 more hour) before putting the cards in the envelopes.
- Mail the card with a “lucky” penny for scratching (you will need extra postage for this).

Remember to weigh your save-the-dates just as you would your invitations to insure that each and every one arrives at its destination.