Imagine this scenario: you’re out and about when you find yourself in need of sharing your number with someone you’ve just met. Maybe it’s the woman who has a son in your child’s kindergarten class, wanting to get your kids together for a play date. Maybe it’s a potential employer who has asked if he can contact you for an interview. Or maybe it’s the guy from the coffee shop who you’re pretty sure could be your soul mate.
If you are like me, you’ll probably find yourself digging around for a scrap of paper to scribble down your number. But wouldn’t it be better to have something on hand so that no matter the occasion or the reason for networking, you’re prepared?
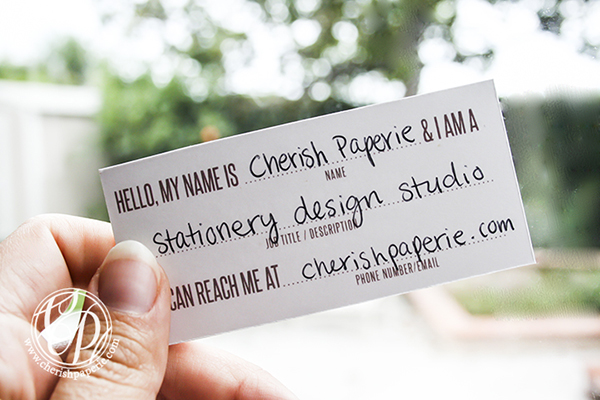
That’s where our DIY Mad Libs Calling Cards come in.
WHAT YOU’LL NEED:
- Printed template pages found here
- Scissors OR X-Acto blade/ metal cork-backed ruler / & cutting mat
- A binding clip, rubber band, ribbon, or business card holder
STEP ONE // PRINTING
Download this pdf and open it up in Adobe Reader (if you don’t have it, you can download it here.) Once open, print the document on a heavyweight card stock of your choice. If you are unfamiliar with how to print a two-sided document, Adobe has created a useful guide for double-sided printing. Even if your printer only supports one-sided printing, you can still manually print two sides by printing and then reloading the paper upside down. Print as many sheets as you want. One sheet will make nine cards.
STEP TWO // CUTTING
Using either scissors or an X-Acto knife or other craft knife, cut along all the dotted lines that are on the back side of the calling cards. An X-Acto knife will give a more precise cut, however, if you decide to use an X-Acto please be sure to follow our safety tips below.
X-Acto Safety Tips:
- Always cut on a self healing cutting mat to protect your work surface. These can be purchased at craft stores like Joann’s or Michaels, or any other art supply store.
- Always use a metal ruler with a cork or foam backing. The ruler helps you achieve a straight cut and the cork backing prevents the ruler from slipping. Line up the ruler along the dotted line, and follow the edge of the ruler with your blade. Make sure your fingertips are not hanging over the edge of the ruler!
- Make sure the X-Acto blade is fresh and sharp. Dull blades can slip or “jump” while cutting, which could cause injury. Plus, sharp blades give a cleaner cut!
- Do not force the blade to cut through the paper entirely on the first pass. Some thicker card stocks may require you to cut two or three times along the same line.
STEP THREE // BINDING
Once all the cards are cut, find a cute way to bind them all together. You can use a binder clip, a rubber band, tie a ribbon around them, or put them in a business card case. Now they’re ready to take on the go, so no matter where you are or who you meet, you’ll never miss another opportunity to say “hello”.
STEP FOUR // NETWORK
When using the cards simply fill out your name, number or email, and job title or a description of yourself or where you met the other person. You can change it up depending on who you’re swapping contact information with, which is a kind of flexibility that a standard business card doesn’t offer. You can use the cards to obtain someone else’s information as well.
Oh, and if it turns out that the guy from the coffee shop actually IS your soulmate, let us know when you’re ready to have your wedding stationery done. We’ll be waiting for you! ![]()










I think these are great and something I can use in the future when networking. thank you!
Thanks! We’d love to see how yours turn out! We’re on instagram and Twitter, @Cherishpaperie! Send us a picture!
That would be convenient! Thanks for the template so I can try it!
Let us know if you try it! We’re on Instagram and Twitter, @cherishpaperie! Send us a picture if you end up doing it!
What a great and fun (and easy) idea! I love Mad Libs
Thanks Amber, Mad Libs are fun Glad you like the idea!
This looks like a really fun, and not too hard project for me to do. I need simple, and this is simple. Thanks for sharing.
Thank you Tiffany! We’re on instagram and Twitter, @Cherishpaperie! Send us a picture if you end up trying the tutorial!
This is such a neat idea and so easy to do! Thanks for the tutorial!
Thank you Jamie! They are really easy to make. Glad you like it! We’re on Instagram and Twitter, @Cherishpaperie! Send us a picture if you end up trying the tutorial!
This is such a useful printable!
Thanks! We thought so too. If you try it out, send us a picture! We’re on Instagram and Twitter, @CherishPaperie!
Happy crafting!
Such a cute idea and I could see these coming in handy to have, plus I totally love printables
A very nice way to stay organized as a mom and a blogger both. Thanks for sharing this and the template!
What a SUPER cool idea! I am pinning it to my blog tips board, because I can see it being most useful to me as a blogger, but the fill in the blank aspect makes it great for versatility – what if someone wanted my help in some other capacity? It makes it easy to customize, and memorable, too! Thanks!
Thank you! You’re right on the money, that was the idea exactly! For people who are constantly out, meeting new people and doing different things, we hope that something like this would come in handy.
I love this so much, Gina! Soon I’m attending my first con for fiction writers, so these would be absolutely perfect. And the DIY instructions are a total cinch, to boot (I’m totally hopeless when it comes to DIY projects) – so thanks for that, especially! :]
Thanks for sharing!
–Candice